Home » Without Label » Putting Trim On Cabinets : The Easiest Way To Install Crown Molding On Cabinets - We built a frame that would sit on top of the cabinet and that we could attach the trim to the frame above the cabinet.
Putting Trim On Cabinets : The Easiest Way To Install Crown Molding On Cabinets - We built a frame that would sit on top of the cabinet and that we could attach the trim to the frame above the cabinet.
Putting Trim On Cabinets : The Easiest Way To Install Crown Molding On Cabinets - We built a frame that would sit on top of the cabinet and that we could attach the trim to the frame above the cabinet.. Crown molding is decorative trim that is added to the top of your cabinets. I went to home depot today and they said that if i put wood trim that was 1/4 inch thick (like listed above), if we drilled handles into the trim, the wood trim would split. Here is it all painted out… Take the mdf trim pieces off the cabinet door and place them right next to the side they will be installed on, putting them front side down. So i pulled out a drawer and marked on the trim how long the piece needed to be.
This allows the trim carpenter to set vanities up tight to tiled areas and install base and shoe molding. Take the mdf trim pieces off the cabinet door and place them right next to the side they will be installed on, putting them front side down. Shimming up a cabinet to make it level and plumb is much easier than cutting the bottom to make it fit square and flush. Dave shows every step for installing crown molding on a cabinet with straight cuts. Shim the low end until you get a level reading.
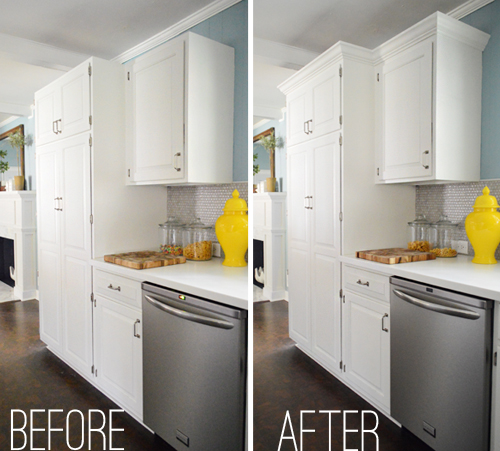
How To Install Cabinet Light Skirt Molding Youtube from i.ytimg.com Crown molding is decorative trim that is added to the top of your cabinets. If you have an average ceiling height, about 8 feet high, 3 to 6 inches of crown molding can usually help fill any kitchen cabinet gaps. House flipping brothers dave and rich show how to install kitchen cabinet crown molding and trim with tips. Measure along the top perimeter of the cupboards. It doesn't stick out at a 45 degree angle like the crown does. After that, i used some small, decorative wood trim to hide the seam between the cabinet and the 1″x6″. The majority of that was cutting all of those trim pieces and then making sure they were even across all drawers (darn ocd). If you have high ceilings, we recommend leaving space.
Cut pieces of poplar as needed on a miter saw so that you have enough poplar to nail to the top perimeter all the way around.
This step completes the addition of trim to the kitchen cabinet. To find the high spot of the floor: This video covers all aspects of cabinet molding installation, including side molding, toe kick, and crown molding. Using our nail gun, we nailed 3 1/4 baseboard around. This way works well for me. So i pulled out a drawer and marked on the trim how long the piece needed to be. Day 3, the other half. Cut pieces of poplar as needed on a miter saw so that you have enough poplar to nail to the top perimeter all the way around. I went to home depot today and they said that if i put wood trim that was 1/4 inch thick (like listed above), if we drilled handles into the trim, the wood trim would split. We placed a 1×2 board under the cabinet with brad nails, making it flush with the front. From gary katz, forum technical advisor : It doesn't stick out at a 45 degree angle like the crown does. Place a weight on it and leave it for 10 to 12 hours.
To find the high spot of the floor: From what you've said i'm picturing a piece of molding that lays flat would look good between the cabinets and soffit to hide the gap and then i can picture crown molding where the soffit and ceiling meet. This will give you something to nail the trim into at the bottom. See more ideas about cabinet molding, update cabinets, kitchen remodel. Crown molding is decorative trim that is added to the top of your cabinets.
How To Add Crown Molding To The Top Of Your Cabinets Young House Love from images.younghouselove.com Install trim above cabinets while the pieces of strapping can be cut at a straight angle, you want to make sure you properly cut all your finishing trim pieces! Yup, we got a little trim. This will remove dust to help the liquid nails or wood glue adhere. Then, take a dry cloth and wipe both mdf trim pieces and cabinet door. Start by removing all the quarter round from the base of the cabinets. I used a pry bar and my hammer to pull those off. Shim the low end until you get a level reading. To make the corner, flip the trim piece over and cut again.
Dave shows every step for installing crown molding on a cabinet with straight cuts.
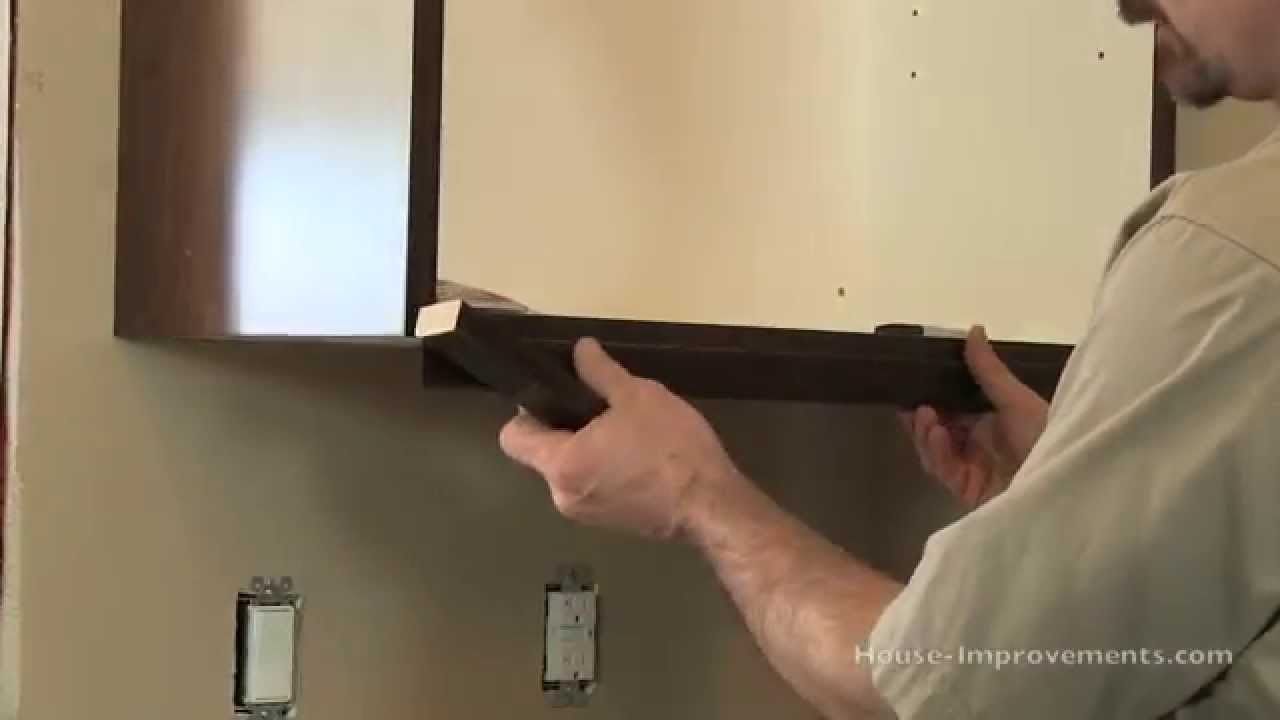
We built a frame that would sit on top of the cabinet and that we could attach the trim to the frame above the cabinet. This step completes the addition of trim to the kitchen cabinet. Here we share with you some builder tips for making sure your trim carpenter gets the job done right. The majority of that was cutting all of those trim pieces and then making sure they were even across all drawers (darn ocd). House flipping brothers dave and rich show how to install kitchen cabinet crown molding and trim with tips. Yup, we got a little trim. The miters are a lot easier to cut on these little guys, because the trim sits flush to the cabinet. The frame measures the exact same size as the sides and front of the cabinet. Shimming up a cabinet to make it level and plumb is much easier than cutting the bottom to make it fit square and flush. Hi, maureen, congrats on getting a drill! Because i'm a little cray. Using our nail gun, we nailed 3 1/4 baseboard around. Shim the low end until you get a level reading.
Using our nail gun, we nailed 3 1/4 baseboard around. I used a pry bar and my hammer to pull those off. Clamp the filler strip to the cabinet using a cabinet claw. Drill a pilot hole completely through the cabinet frame and partway into the filler strip. The project took 5 pieces of the same cabinet trim i used on the cabinets (trying to keep it cohesive), so the entire cost was around $26 (for 8 drawers).
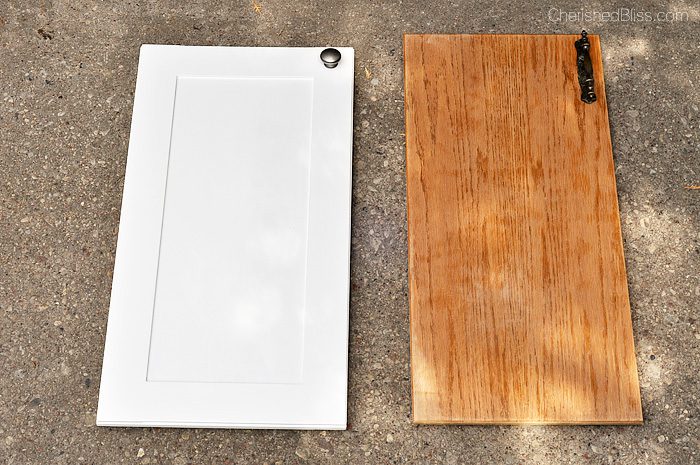
Kitchen Hack Diy Shaker Style Cabinets Cherished Bliss from cherishedbliss.com Drill a pilot hole completely through the cabinet frame and partway into the filler strip. After that, i used some small, decorative wood trim to hide the seam between the cabinet and the 1″x6″. Here is it all painted out… Cut the filler strip to length with a miter saw. Shim the low end until you get a level reading. The miters are a lot easier to cut on these little guys, because the trim sits flush to the cabinet. House flipping brothers dave and rich show how to install kitchen cabinet crown molding and trim with tips.this video covers all aspects of cabinet molding i. If you have high ceilings, we recommend leaving space.
We built a frame that would sit on top of the cabinet and that we could attach the trim to the frame above the cabinet.
If it is a wooden trim, simply nail it to the cabinet. Here we share with you some builder tips for making sure your trim carpenter gets the job done right. This will remove dust to help the liquid nails or wood glue adhere. We built a frame that would sit on top of the cabinet and that we could attach the trim to the frame above the cabinet. To make the corner, flip the trim piece over and cut again. Then you can nail the crown to it. Base molding is generally used to provide a decorative trim at the floor level of base cabinets by installing it with the profiled edge facing up. This video covers all aspects of cabinet molding installation, including side molding, toe kick, and crown molding. To find the high spot of the floor: Day 3, the other half. If you have high ceilings, we recommend leaving space. Here is it all painted out… Cut the filler strip to length with a miter saw.